+ Auto Start Session: a new session should be created when a persistent session.
+ Manage Sessions: Session state, it is used to get the cookie value for a session, and to determine if a persistent session matching cookie and Remote IP address should be retrieved from the session list.
+ KeepAlive : If it checked the connection used for the HTTP response is give a 'keep-alive' header in the response content (It is speed up when connected). When KeepAlive is no checked, the connection header 'close' is used in the web response.
+ Cookies: Cookie is header of website, it be server send to client when first access server.
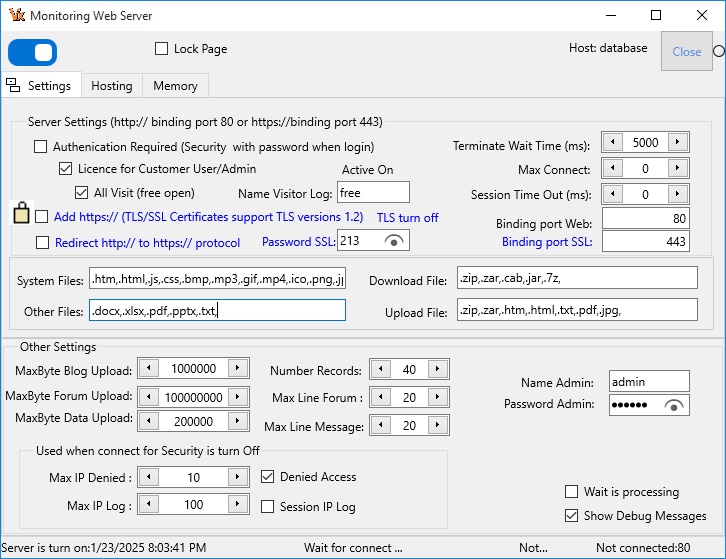
+ Terminate wait time: 0 - 30000 miliseconds. It is an aggregate delay time, that the server should wait.
+ Max Connect: 0-100 It should clients connect at time. When 0 no limited
+ Session time: 0 - 100,000,000 miniseconds: It is used to determine when a Session is stale.
+ Web/Default Port: Port to open nat modem, it used to public website. Usually 80 or 8080.
+ Sys password admin: Password admin to use SYS(,password) functin to get information server from remote client.
+ In VX+ version 2.0 and over. It add support Secure Sockets Layer SSL/Transport Layer Secure TLS certificate protocol website. Support https:// protocol.
+ Only extension file allow access to website (system files, download files, other files).
- System Files: extenions system file allow access from server.
- File download: extenions file to download from server:,.zip,.zar,.bin,.cab,.jar,.7z,.
- Other Files: other extenions file to allow access from server:,.docx,.xlsx,.pdf,.pptx,.txt,.
+ Denied access: If checked remote IP list not access to website. It can used to Denial-of-service attack (DDOS).
+ MaxLenght denied: 3200-32000 byte, default 3200 byte to input remote IP.
+ Area input IP denied. Example:
127.0.0.1;localhost
127.0.0.1-127.0.0.3;
it deniel IP: 127.0.0.1,127.0.0.2,127.0.0.3
+ Max Byte Forum: 1000 - 64000 byte. Max byte for input text forum.
+ Max Line Message: 20 - 100 line. Default 20 line (error, information remote...).
+ Max IP Log : 20-100 line, log in/out (infomations of remote client: domain,status, time, byte send...). Default 100 line.
a.1.2. Script senario: It run before Turn On Server.
a.2. Host Tab:
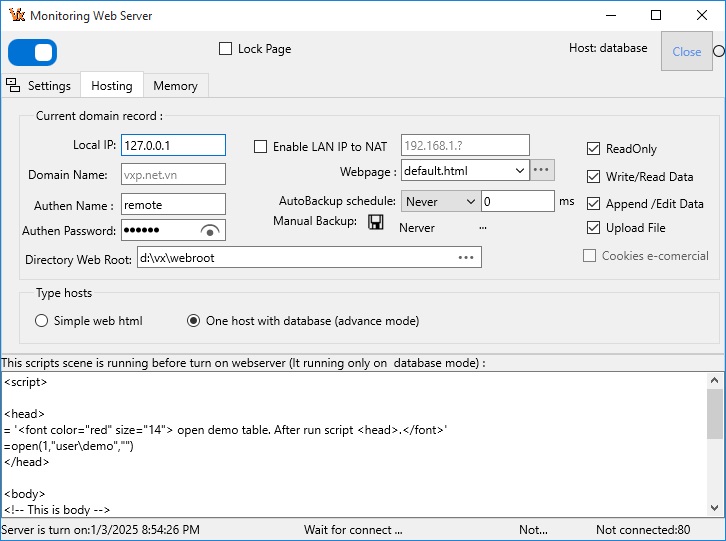
To declare Current domain record and type hosts:
- Current domain record:
+ Domain (Localhost,LAN, IP): is address link to webpage on server.
* Localhost is used to test on this server. It domain: 127.0.0.1
* LAN : It user in Local Area Network when public website. It domain: 192.168....
* IP (Internet Protocol): It address domain IP
+ Enable LAN. If checked to public website.+ User Name: It is remote user name to access to seb server.
+ Password: It is remote user password to access to web server.
+ Webpage: example DEFAULT.HTML.
+ Directory webpage: It is place to put main webpage, like DEFAULT.HTML. Normal directory webpage same directory web root.
+ Directory Web Root: is place to put webpage.
+ AutoBackup Schedule : (Never, 5 minutes, 30 minutes, 1 hour, Evryday, Evryweek, Custom).
It auto backup opened data on server by schedule. After setting schedule you need restart VX+.
Importand, because all dataset loaded in RAM, it need auto write to disk by evry interval time.
You can custom change interval time when choose Custom write to disk.
+ Readonly File: Is checked, client can't delete file on server.
See html function: delfile()
+ Write/Read Data: Is checked, client can read or write database in server.
See html function: replace()
+ Append/Edit Data: If no checked user can't change database on server (not append and not edit record).
See html function: append()
+ Upload File: Is checked, client can upload file to server.
See html function: upload
After that you need write to database host by click to button [Post Host].
To get Domain you click to button [Get Host] .
- Type hosts:
+ One simple web html.
+ One host with Database (advance).
Step 5. Path Weblog: Choose directory put file save login or logout process.
Step 6. Turn on web server. After configuration Setttings and Host and Path Weblog. You Turn On by click switch button ON.
When web server on ready (turn on web server).
* Checked Lock Server : It lock any dialog of server, run functions VX+ from Remote....
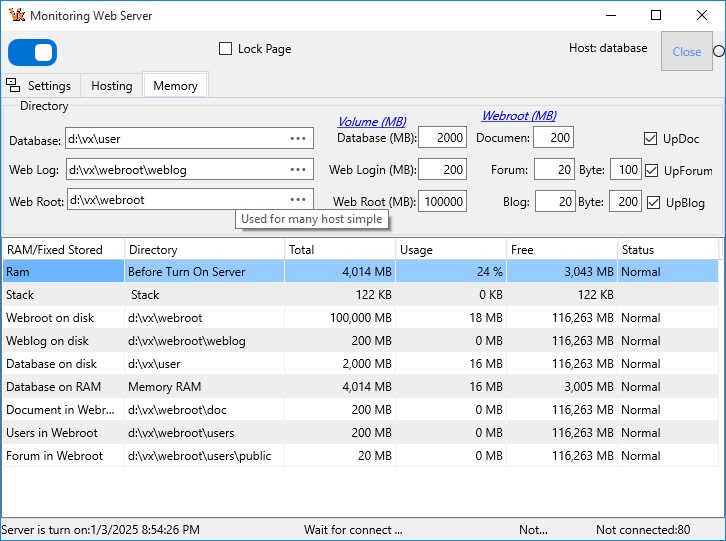
a.3. Memory Tab:
Step 5. When web server is running, Log Tab show in monitor.
In Log Tab you can see Remote user log In or log Out (IP,Name, user, Datetime, Byte send...).
* Note, In type hosts: Dynamic webpage, you can save Data by click button Save.
* You can search information of login or logout of remote user.
Now web server is on ready.
B. Preview webpage:
Open webbrowser (I.E, Ali, FireFox...) then input URL link: 127.0.0.1
* Importand, when you public to remote. This server running Safemode in Window 7, 10.
Don't install any other web browser (like FireFox, Google Crome...) for virus ....
Simple webserver is simple static webpage. For evry body. To created It don't know programming.
You easy created webpage by design popular applications. And put it in server.
With simple webpage, it support limited infomation from designer webpage. You can't change context of designed webpage.
It used advertising infomation about market, tradition, ...
It called dynamic webpage. Remote user can change data.
To create dynamic webpage you need know programming database VX+ in side server.
Remote user can change data on server. Dynamic webpage used when organization: factory, official, class, ...
In this, you can use security mode for domain
* Note, dynamic data webpage you can create one domain.
* You can create many sub simple domain in a main database domain.
- After created webserver you can access by IP:
+ 127.0.0.1 This is localhost for demo.
+ 192.168.1.xx This LAN IP (Local Address Network). This LAN IP will public to router, is opend to NAT port router.
+ 203.101.11.xxx. This example remote (server) IP.
- Or you access by Domain:
Example remote server IP 203.101.11.xxx called domain: www.vxp.net.vn.
Client will browse URL, like:
- https://vxp.net.vn
- vxp.net.vn
- 203.101.11.xxx